
One of the best things about fall RVing is sitting at a campfire with family and friends while making s’mores.
I love a good s’more. However, covered with marshmallow fluff after is not my favorite. That’s when I came up with the idea to test out 3 different camping friendly variations of this mouth-watering family favorite treat. I ranked these S’mores with a friend who is a S’more Connoisseur and we came up with a score on how each of these fair.
RECIPE 1: Score 6/10
A great recipe for a rainy day in your RV when you don’t have access to a fire pit.
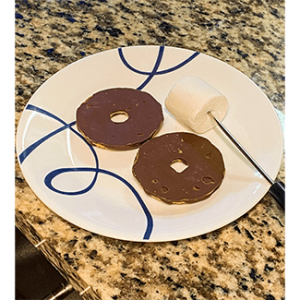
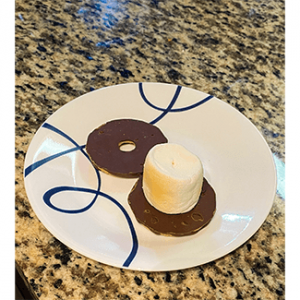
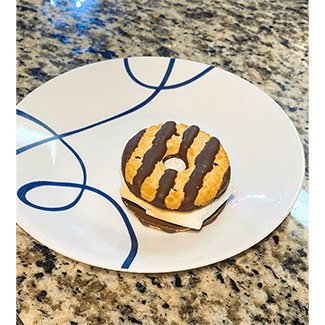
Fudge Cookie S’more:
- Recipe:
- 2 Fudge Cookies
- 1 Marshmallow
- 1 Napkin
- Directions:
- Choose your favorite marshmallow and place in the microwave on a microwave safe plate for 15 seconds
- Optional: S’mores Indoor Toaster
- After 15 seconds, place the marshmallow on the cookie and gently press down the other cookie.
- Choose your favorite marshmallow and place in the microwave on a microwave safe plate for 15 seconds
- Pros:
- Softer to eat and works well if you have sensitive teeth
- Doesn’t crumble when bit into
- Chocolate already there
- Smaller in general, easier to hold
- Save space in packing food
- Cons:
- Messier
- Could be changed with the type of cookie used
- Extremely sweet
I had high hopes for this recipe. It was a 2-in-1 S’more that will help save on space in an RV. Our biggest worry when putting this one together was that we didn’t want to melt the chocolate before the marshmallow even touched it. We had to be cautious of this one since the chocolate melts easily when handling it.
We toasted our marshmallows over an electric, indoor S’mores toaster until golden brown. Gooey inside, crispy inside. The perfect marshmallow to use for this test. As I go in to create my S’more and gently press down on the top side of my cookie, I realize my biggest mistake with this brand has a hole in the center! It made a mess. It was easier to eat because the cookie was softer and didn’t break into pieces. That was a big plus to me. My biggest issue with the Classic S’mores was always how they broke instantly when they were bit into.
The convenience was what we gave top marks for. It was a fun alternative to the classic. If you had a different version of these cookies on hand they would be a great go to for home S’mores creations. We both enjoyed the creativity but agreed that if we were going to do this again it would be better to just go with the classic.
RECIPE 2: Score 8/10
Great for families who want easy clean up for their next adventure.
Walking S’mores:
- Recipe:
- 1 bag of Graham Cracker Cookies
- Chocolate Chips or Bar of Preference
- 4 Big Marshmallows or Mini Marshmallow
- Optional: Fruit and Toppings
- Optional: Fruit and Toppings
- Directions
- Place marshmallow and chocolate into the snack cookie bag
- Heat up bag in the fire until marshmallows and chocolate are gooey
- Mix it all together, enjoy a fun and easy dessert!

- Pros:
- Easy to make
- Clean up easy
- Can add fruit to spice up a plain smore
- Cons:
- If a mug is used, clean up fast so the marshmallow doesn’t harden
- Potential watery from fruit
- Needs to be carefully monitored so no sugar overload
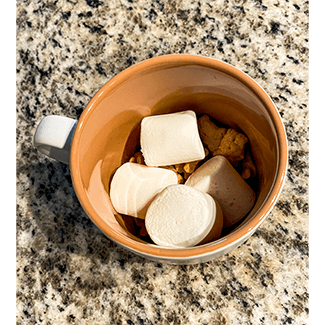
- The original I saw of this was made in a snack-sized cookie bag. But for this, we used mugs.
This one was camp friendly and all around, family-friendly. The concept is the same as a Walking Frito Chili Pie. No mess, easy cleanup, and a shirt may live to see another day.
I made mine with 5 big marshmallows, graham cracker cookies, milk chocolate, and fruit. My friend made hers with dark chocolate and 4 marshmallows. We discussed what kinds of fruit might be good if they were added: bananas, strawberries, cherries, and blueberries were the ones we thought would be best.
We used the microwave which is not as fun as toasting but for this, it worked. I put in 30 seconds and watched it carefully. I pulled it out after the marshmallows started to expand. After it was out, I stirred it up and it was great. Very little mess and all of it was contained! Great for anyone with kids or who doesn’t want a mess to clean up ;). I noticed the graham cracker cookies did not stay crunchy long and I wanted them to last longer. The strawberries that were added had the water leached out of them. Due to this, the bottom ended up watery. My friend did not notice this issue with hers. It was possible because I used milk chocolate or a combination of the two. Overall, it was successful, and I could see using other snack cookies for this if these were not on hand. This recipe is Camping and RV Friendly with either version of the recipe.
RECIPE 3: Score 7/10
Fun to make at a campsite or at your home when you are missing your RVing adventures.
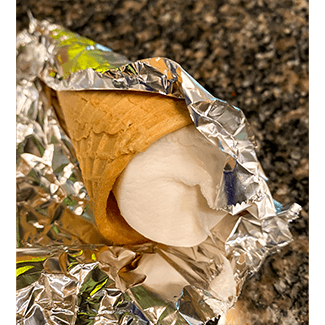
Campfire S’mores:
- Recipe
- 1 Any Type of Ice Cream Cone
- Chocolate Chips
- Marshmallows
- Foil
- Optional: Fruit and Toppings
- Directions
- Tear off the amount of foil
- Place cone on and pick it up
- Mix the marshmallows and chocolate chips
- Wrap it up and place in fire or oven
- Leave in for about 90 seconds
- Take it out carefully with the right tools and then open slightly to cool off

- Pros:
- Easy to fix beforehand
- Safer than the Classic
- Save on storage
- Cons:
- Not as fun to prepare
- Can’t make the marshmallow golden brown (or burnt 😉
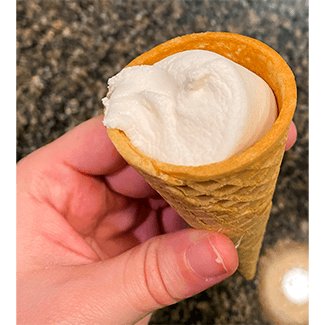
This recipe can be prepared ahead of time.
I chose a sugar cone because it is thicker and will not end up soggy. The marshmallows best for this are the mini ones but larger ones work as well. There was not a set amount of chocolate chips used. Keep in mind who these are for and what kind of chocolate is being used. Milk chocolate is more sugary but easier to melt and the darker ones are harder to melt while not as sweet. A reminder, marshmallows will expand due to heat so leave some space at the top for them to expand. Add fruit before cooking because if these are pre-made with fruit they would use valuable refrigerator space.
Once finished assembling it, wrap it in the foil. They can be stored in an airtight container and not refrigerated if they have no fruit. Caution should be used as well as the right tools for it when it is placed or taken out of the fire. It should be over the fire for about 90 seconds. With the correct tools and caution, take it out and let it cool off before eating it.
I was happy to find out how successful it was. It will work better with mini marshmallows then it would truly mix together better than having a layer of chocolate and a layer of marshmallow. I enjoyed getting to the bottom of the cone and finding all the melted chocolate down there. I would suggest, however, that the tin foil should be sprayed beforehand with coconut oil spray so that the marshmallows would not stick on the foil. They could be left in longer once they were properly prepared.
This was a successful recipe. I would definitely recommend this to others and make it as a gift for people. I certify this as RV and Camping Friendly Recipe.
After trying all of these S’mores, I certainly ended up with a favorite one by the end. My favorite recipe was the Walking S’mores. It’s easy and no mess! This is an easy recipe for anyone to make at home or on a trip. Walking S’mores will bring a smile to anyone’s face on your next RV Trip.
Make sweet memories for years to come with these S’mores recipes. If you liked your creations tag us on Instagram and Facebook, we would love to see what you make on your next trip! What fall camping traditions are you looking forward to this year? We’d love to help you prepare for your fall camping trips in your new or used RV, so contact us today!
